Why You’ll Love This DIY
Making your own soap at home is simple and satisfying with this DIY Natural Castile Soap from Scratch (Made with Pure Olive Oil). Castile soap is well-known for its gentle, all-natural ingredients, making it ideal for sensitive skin. With just three ingredients—pure olive oil, distilled water, and sodium hydroxide—you can easily create a versatile and effective soap that’s perfect for everyday use.
This natural soap is not only great for your skin but also environmentally friendly. It’s biodegradable and free from synthetic chemicals, making it a safe choice for both your body and the planet.
If you’ve been thinking about switching to natural skincare, this recipe is the perfect starting point. It’s quick, easy, and provides a gentle clean for the whole family.
Ingredients Needed
Choose high-quality ingredients to boost the effectiveness and safety of your DIY beauty products.
- Pure Olive Oil: Choose a light-colored olive oil.
- Distilled Water
- Sodium Hydroxide: Also known as caustic soda or lye.
Tools Needed
- Scale to weigh quantities
- Large beaker
- Medium beaker
- Medium bowl
- Small silicone spatula
- Electric hand mixer
- Silicone soap mold in your preferred shapes
Prior to use, ensure that both your utensils and containers are properly cleaned and disinfected. Wash them with warm soapy water, dry with a tissue, and then sanitize by spraying with 70% medical alcohol. Wipe them clean and let them air dry before use.
Safety Precautions
We are using the cold process soap making technique in this guide. This requires mandatory safety measures that you should take during the process:
- No part of your skin should be exposed at any time during the process (a long-sleeved shirt and an apron are good ideas here)
- Don’t let any children or pets come near your soap making work table
- Your soap making table should be in a ventilated area at all times (an open window is a good idea )
- Latex gloves, safety goggles, and face masks should be worn at all times
- Only use silicone, plastic, and stainless steel tools
- All utensils and tools used for cold process soap making should be dedicated solely to this purpose and not used for food preparation.
Steps: DIY Natural Castile Soap from Scratch
This DIY Natural Castile Soap recipe is perfect for beginners in the world of natural skincare. It simplifies the soap-making process, making it easy and enjoyable. As you gain confidence, you can experiment with adding fragrance oils and colors to customize your soap, letting your creativity shine.
Make sure that you adhere precisely to the ingredient measurements to obtain great results. Following the recipe closely will help ensure a successful soap-making experience and create a product you can be proud of.
Measure Out the 3 Ingredients Separately
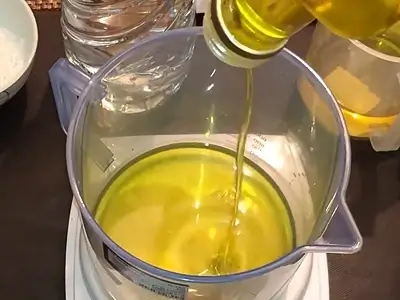
1- Start by pouring 600 grams (21.16 oz) of pure, light-colored olive oil into a large beaker.
2- In a separate medium beaker, pour 109 grams (3.84 oz) of distilled water.
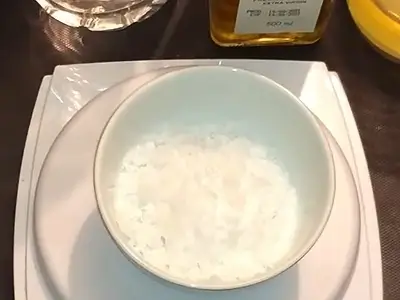
3- In a separate medium bowl, measure out 79 grams (2.78 oz) of sodium hydroxide (also known as caustic soda or lye).
Prepare the Sodium Hydroxide Solution
4- Slowly and while continuously stirring with a silicone spatula, pour the sodium hydroxide into the distilled water: Begin by adding a small amount, stirring well after each addition, and gradually continue until all of the sodium hydroxide is fully dissolved.
Important: Never pour distilled water onto sodium hydroxide, as this can be hazardous! Keep the beaker at a safe distance from yourself.
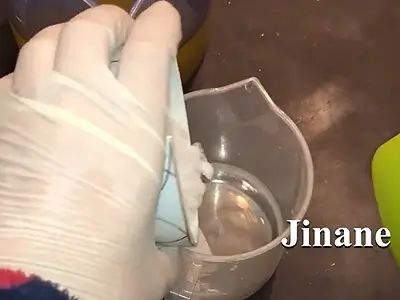
5- Continue stirring until all the sodium hydroxide is fully dissolved in the distilled water. Be aware that the mixture will become hot during this process.
6- Allow the mixture to cool to room temperature before proceeding. Ensure that the beaker is out of reach of children and pets.
Make the Soap Mixture
7- Ensure that both the olive oil and sodium hydroxide solution have cooled to below 40℃ (104℉), and are close to each other in temperature (within 1-3℃ or 2-5℉ of each other).
8- Slowly pour the sodium hydroxide solution into the oil while stirring with the silicone spatula. Do not pour the oil into the sodium hydroxide solution.
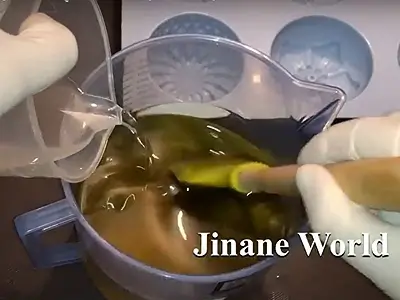
9- Once all the sodium hydroxide solution has been added to the oil, continue stirring the mixture with the spatula for about 40 seconds. You’ll notice it starting to thicken as you stir.
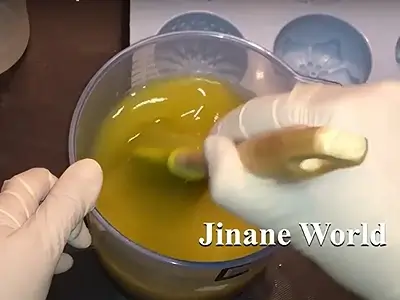
10- Use an electric hand mixer to blend the mixture for 20 seconds. Then, stop the electric mixer and stir manually with the spatula or the mixer shaft for a few seconds.
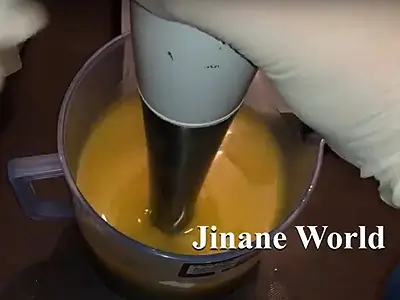
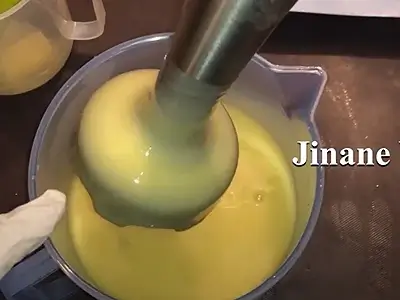
11- Continue alternating between blending with the electric mixer and manual stirring, until you see the mixture thicken: A viscous, thick layer covers the lower part of the electric mixer shaft, as shown in the image below. When you achieve this thickening, this means that the saponification (the process of making the soap) is complete.
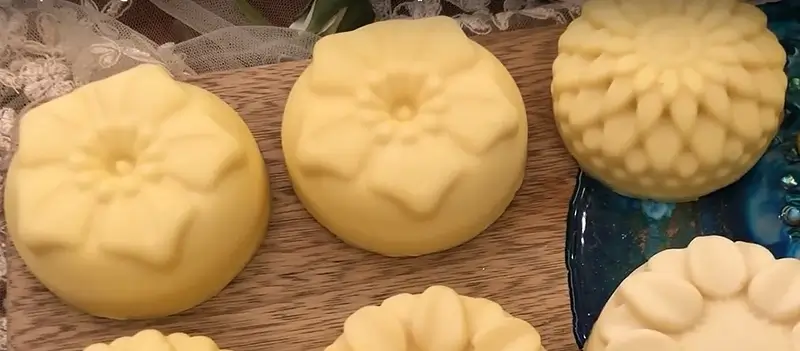
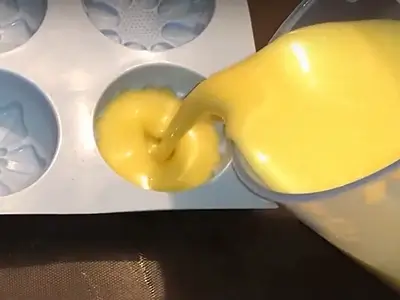
12- Pour the mixture into the mold cavities.
Soap Hardening and Curing
13- Cover the mold’s surface with cardboard or a similar material, and allow the mixture to cool and harden for 24-48 hours. This covering helps prevent ash from forming on the surface. In colder weather, first cover the mold’s surface, then wrap it with a heavier blanket for added insulation.

14- After the soap has solidified, gently remove the bars from the mold.
15- Allow the soap bars to cure for a minimum of 6 weeks. This curing period allows the sodium hydroxide to fully dissipate, making the soap safe for use on the skin.
Note: To ensure proper aeration while curing, and prevent moisture buildup, place them on an unused grill or a similar elevated surface. This allows air to circulate around the bars, promoting even drying and enhancing the final texture of your soap.
16- After a minimum curing period of 6 weeks, your DIY Natural Castile Soap is complete and ready to use!

Hints and Tips
Measure Accurately: Precision is key in soap-making. Use a digital scale to measure your ingredients accurately for the best results.
Cure Time: Allow your soap to cure for at least six weeks before using it. This helps ensure that the lye has fully saponified and the soap is safe for your skin.
Experiment with Additives: Once you’re comfortable with the basic recipe, feel free to experiment with natural additives like essential oils or dried herbs for added fragrance and benefits.
How to Use DIY Natural Castile Soap
a. For Body Wash: Wet your skin and rub the solid soap bar directly onto your skin or use a washcloth or sponge to create a lather. Rinse thoroughly for a refreshing clean that leaves your skin feeling soft and moisturized.
b. As Hand and Facial Soap: Wet your hands or face, then rub the soap bar between your palms to create a gentle lather. For hands, continue to rub your palms together. For your face, gently massage the lather into your skin. Then, rinse well with water. This gentle formulation effectively removes dirt and bacteria without drying out your skin.
c. For Hair: Wet your hair and rub the soap bar directly onto your scalp to create a lather. Massage gently and rinse thoroughly. Since Castile soap can be drying for some hair types, follow with a conditioner or a natural hair oil to maintain moisture.
d. Household Cleaner: Grate the soap bar and mix it with water (approximately 1:10 ratio) to create an effective all-purpose cleaner for surfaces like countertops, floors, and even dishes. It’s a great way to keep your home clean while avoiding harsh chemicals.
Benefits
Nourishing Moisture: Pure olive oil is rich in vitamins and antioxidants, providing deep hydration and nourishment for the skin. This soap helps maintain skin’s moisture balance, leaving it soft and supple.
Gentle Cleansing: The natural properties of olive oil make this soap effective at removing dirt and impurities without stripping away essential oils, making it suitable for all skin types, including sensitive and acne-prone skin.
Pure and Safe: After six weeks of curing, the sodium hydroxide fully dissipates, resulting in a mild, pure olive oil soap that is free from synthetic additives and harsh chemicals. This makes it safe for daily use on both the body and face.
Long-lasting Formula: The resulting soap can last up to 6 months or more, maintaining its beneficial properties throughout its lifespan.
Eco-Friendly: Being biodegradable and crafted without harsh chemicals, this soap is an environmentally responsible choice, reducing plastic waste and promoting a more sustainable lifestyle.
Versatile Applications: This DIY soap can be used for various purposes, including body wash, shampoo, facial cleanser, and even household cleaning, making it a multifunctional addition to your home.
Here are more articles that might be of interest:
- DIY Natural Face Wash for Sensitive Skin: Easy, Gentle, and Effective
- DIY Soap for Oily Skin Recipe: Banish Oil and Brighten with Charcoal and Turmeric
- DIY Face Wash with Tea Tree Oil: Treat Your Skin to This Must-Try Recipe
- Homemade Foot Soak for Dry Feet: The Best DIY Solution for Happy Feet
- DIY Soap for Sensitive Skin with Oats and Honey: Gentle and Soothing Recipe
Video How-To on My Channel | Jinane World
The steps to make the DIY Natural Castile Soap from Scratch are demonstrated at the timestamp 12m44s of this video.