Creating a DIY cream base for face is the first step towards personalized skincare solutions. This versatile base allows you to tailor your moisturizing cream to your specific needs by adding beneficial ingredients like niacinamide, hyaluronic acid, collagen, etc.
With a few simple ingredients, you can craft a high-quality cream base at home. Follow this easy recipe to build the foundation for your custom face cream and achieve glowing, healthy skin.
Ingredients Needed
Choose high-quality ingredients to boost the effectiveness and safety of your DIY beauty products.
- Ewax Arlacel 165 (emulsifying wax). You can also use Ewax NF or Ewax BTMS 50. The Ewax Arlacel 165 is a synthetic blend of fatty acids and alcohols used to blend oils and water. While its components can be derived from natural sources, the final product is typically considered synthetic.
- Cetyl alcohol (also called Lanette 16). This is a fatty alcohol that can be derived from natural sources like coconut oil or palm oil, though it is often produced synthetically for consistency. It thickens and smooths texture.
- Jojoba oil (or grapeseed oil, sweet almond oil)
- Distilled water
- Vegetable glycerine
- Preservative. Here I will use Germall plus
Tools Needed
- Scale to weigh quantities
- Two glass beakers
- Glass mixing rod
- Silicone spatula
- Electric hand mixer
- Small container to store the DIY Cream Base for Face
Prior to use, ensure that both your utensils and containers are properly cleaned and disinfected. Wash them with warm soapy water, dry with a tissue, and then sanitize by spraying with 70% medical alcohol. Wipe them clean and let them air dry before use.
Steps: DIY Cream Base for Face
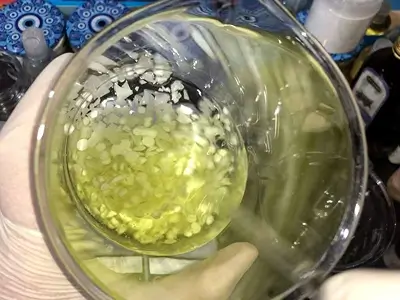
Oil Phase
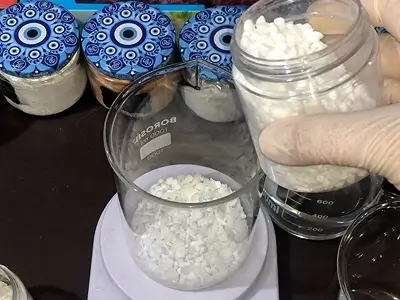
1- Put 30 grams (1.05 oz) of Ewax Arlacel 165 in a glass beaker.
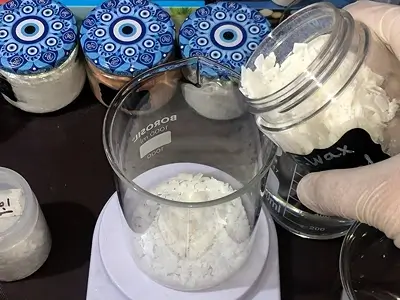
2- Add 10 grams (0.35 oz) of cetyl alcohol.
3- Add 100 grams (3.52 oz) of jojoba oil. Alternatively, you can combine 50 grams (1.76 oz) each of jojoba oil and sweet almond oil for a total of 100 grams (3.52 oz).
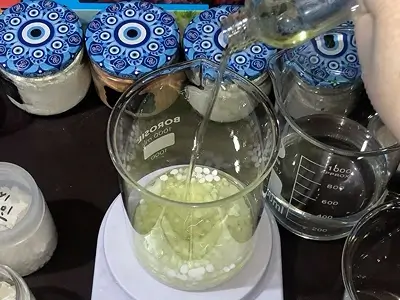
4- These are the oil phase ingredients. Put the beaker aside, and let’s move on to the water phase.
Water Phase
5- In a second beaker, pour 340 grams (12 oz) of distilled water.
6- Add 15 grams (0.52 oz) of vegetable glycerine.
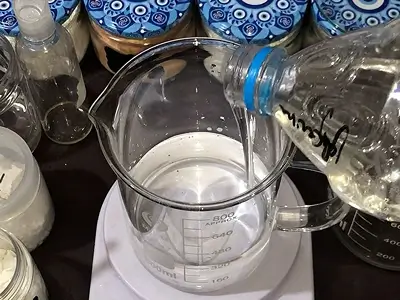
7- Stir the contents with a glass mixing rod.
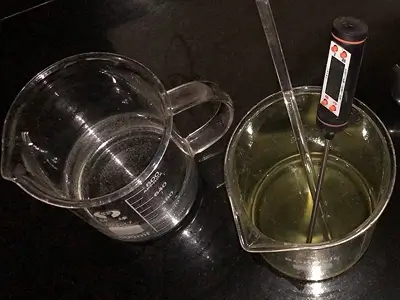
Heating and Combining Both Phases
8- Place both beakers in a bain-marie (hot water bath). A bain-marie is made by placing the beakers in a larger pot of hot, steaming water. This will gradually heat the contents of the water phase, and melt the ingredients of the oil phase.
9- Keep the beakers in the bain-marie until the oil phase ingredients have melted and reached a temperature of 65 degrees Celsius (149 degrees Fahrenheit) and the water phase has reached a temperature of 70 degrees Celsius (158 degrees Fahrenheit).

10- After the correct temperatures have been reached for both phases, pour the contents of the water phase over the oil phase, while stirring with a glass mixing rod.
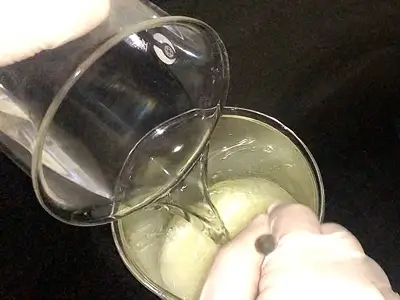
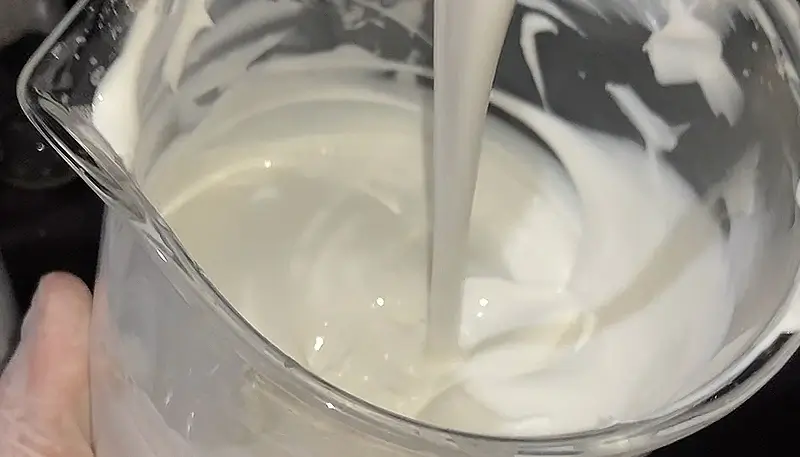
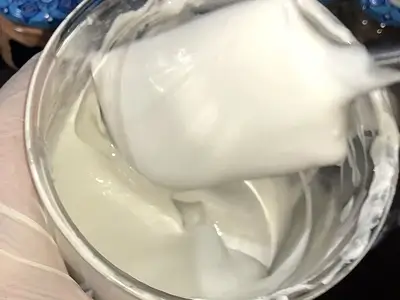
11- Now, use an electric hand mixer to thoroughly mix the contents and thicken the cream. Since the mixture is still hot, achieving the desired cream consistency requires intermittent mixing and cooling: Mix for 15 seconds, then allow 5 minutes for cooling before mixing again.
12- Continue this process of mixing and cooling until the cream reaches the desired consistency, as shown in the image below.
13- At this stage, the contents have cooled sufficiently to allow adding the preservative. For our cream quantity, add 2.5 grams (0.088 oz) of preservative germall plus.
14- Mix thoroughly for one minute with a silicone spatula.
pH Acidity Test
Now that the DIY Cream Base for Face is finished, it’s crucial to ensure its pH acidity level is safe. Skipping this step could lead to potential allergic reactions if the cream’s pH is too high. Let’s proceed with checking.
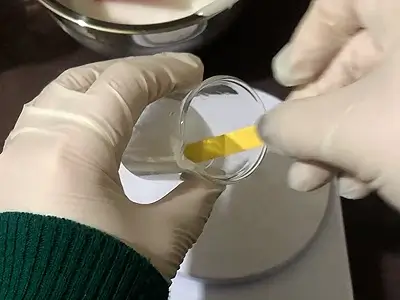
15- In a small beaker or bowl, put 2 grams (0.07 oz) of the DIY cream base.
16- Add 8 grams (0.28 oz) of distilled water.
17- Mix thoroughly with a glass mixing rod.
18- Take a paper from the pH acidity test kit, and dip it in the solution just prepared.
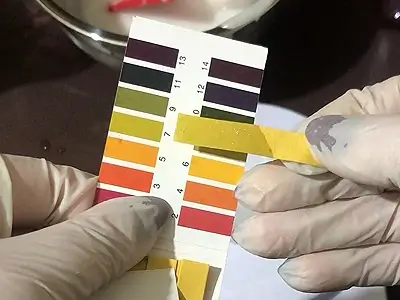
19- The soaked part of the paper will change color, and the pH acidity level of the solution is indicated by this color. Compare the color against the range of colors in the pH kit, and note the number against the matching color.
In my case, the color is light green and the pH level is 7. The recommended range for the DIY cream base is 4.5 to 5.5. Let’s lower it.
20- To lower the pH level, mix equal parts of citric acid and distilled water, e.g. 10 grams (0.35 oz) of citric acid and 10 grams (0.35 oz) of distilled water.
21- Add 3-5 drops of the citric acid solution to the whole quantity of the DIY Cream Base in the beaker.
22- Mix thoroughly.
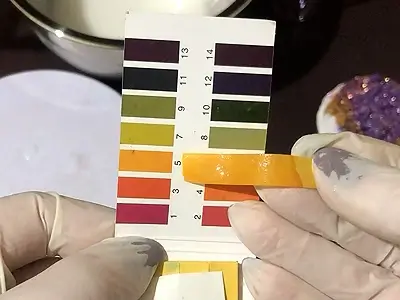
23- Repeat the pH test by following the steps 15 to 18 above.
This time, in my case, the pH reading is 5 which is good.
24- Once you are satisfied with the pH test, proceed to scoop the DIY Cream Base into a suitable container for storage.
How to Use: DIY Cream Base for Face
After crafting your DIY cream base, here’s how you can use it:
a. Customization: Decide on the additives you want to incorporate into your cream base, such as niacinamide, hyaluronic acid, collagen, etc. Each additive offers unique benefits for your skin, so choose based on your skincare needs.
b. Measurement: Calculate the appropriate amount of each additive based on your cream base’s total volume. Follow recommended usage guidelines for each additive to ensure effectiveness without compromising the stability of your cream base.
c. Example: To demonstrate how to use the DIY Cream Base for Face in your creams, check out this tutorial:
DIY Alpha Arbutin Cream for Face: Powerful Homemade Solution for Bright Skin
Benefits
Here are the benefits of using the DIY Cream Base for Face:
Moisturization and Hydration: The combination of Ewax (Arlacel 165), cetyl alcohol, jojoba oil, and vegetable glycerine deeply moisturizes the skin, providing hydration and preventing dryness.
Skin Protection: Jojoba oil and vegetable glycerine form a protective barrier on the skin, reducing water loss and enhancing the skin’s natural barrier function. This helps in maintaining skin health and protecting against environmental stressors.
Customizability: Ewax (Arlacel 165) and cetyl alcohol enable the formulation of a stable and smooth cream base that can be easily customized with additional skincare additives like vitamins, hyaluronic acid, or botanical extracts to address specific skin concerns.
Antioxidant Benefits: Jojoba oil contributes antioxidants that help protect the skin from free radical damage, promoting a youthful and healthy appearance.
Together, these ingredients create a versatile DIY cream base that promotes healthier-looking skin, addresses various skin concerns, and allows for a personalized skincare regimen tailored to individual needs.
Here are more articles you might be interested in:
- DIY Alpha Arbutin Cream for Face: Powerful Homemade Solution for Bright Skin
- Effective DIY Face Mask for Wrinkles: Discover the Power of Aloe Vera and Egg
- Natural DIY Face Mask for Acne: Cinnamon Honey Blend for Clear Skin
- Oriental DIY Body Butter with Amber Scent: A Luxe Skin Treat
- Radiant DIY Night Cream for 40+: Niacinamide (B3) and Frankincense Blend
Video How-To on My Channel | Jinane World
The steps to make the DIY Cream Base for Face are demonstrated in this video.