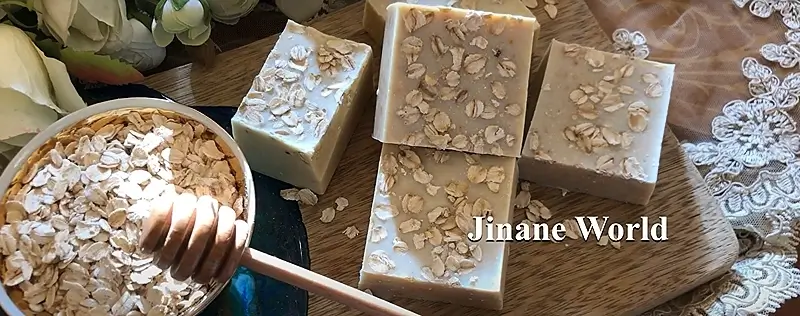
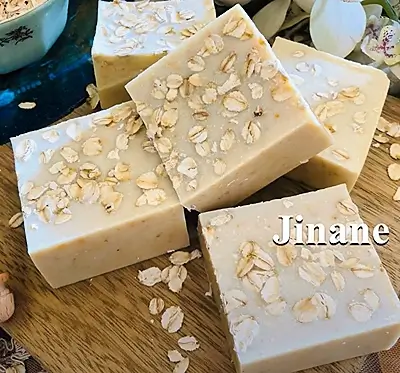
DIY Soap for Sensitive Skin with Oats and Honey is a perfect solution for those with delicate skin. This homemade soap combines the calming and skin-soothing properties of oats with the moisturizing benefits of honey, creating a nurturing blend for sensitive skin.
Making your own soap ensures you control the ingredients, avoiding harsh chemicals. Follow this straightforward recipe to nourish and protect your skin naturally with this gentle and soothing soap, providing comfort and care with every use.
Ingredients Needed
Choose high-quality ingredients to boost the effectiveness and safety of your DIY beauty products.
- Olive oil
- Coconut oil: Coconut oil is key to creating a rich, bubbly lather in soap. Its high fatty acid content helps generate and sustain a luxurious foam, enhancing the overall cleansing experience.
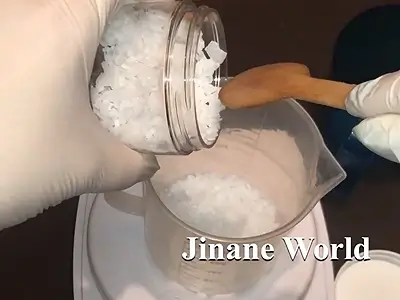
- Palm oil: Choose certified sustainable palm oil. Palm oil is essential for keeping the soap solid during use. This ingredient helps the soap bar stay firm and durable, so you can enjoy its benefits for a longer time.
- Oat flakes ground into fine powder. Use a blender, food processor, coffee grinder, or spice grinder.
- Natural honey
- Sodium hydroxide: Also known as caustic soda or lye, it is a crucial ingredient in soap making. Although derived from a chemical process and not considered natural, it is essential for the soap-making reaction. During this process, sodium hydroxide reacts with oils to transform into soap. After the soap cures for 6 weeks, no sodium hydroxide will remain.
- Distilled water
Note: If the coconut oil and palm oil are solid due to cooler temperatures, melt them in separate containers until they become liquid. By the time you need to use them, they will have cooled and be ready to mix with the other ingredients.
Tools Needed
- Safety items: Latex gloves, safety goggles, face mask
- Scale to weigh quantities
- One large beaker
- Two medium-sized beakers
- Small bowl
- Teaspoon
- Silicone spatula. Use only silicone or stainless steel.
- Electric hand mixer
- Knife
- Rectangular silicone mold
Prior to use, ensure that both your utensils and containers are properly cleaned and disinfected. Wash them with warm soapy water, dry with a tissue, and then sanitize by spraying with 70% medical alcohol. Wipe them clean and let them air dry before use.
Safety Precautions
We are using the cold process soap making technique in this guide. This requires mandatory safety measures that you should take during the process:
- No part of your skin should be exposed at any time during the process (a long-sleeved shirt and an apron are good ideas here)
- Don’t let any children or pets come near your soap making work table
- Your soap making table should be in a ventilated area at all times (an open window is a good idea )
- Latex gloves, safety goggles, and face masks should be worn at all times
- Only use silicone, plastic, and stainless steel tools
- All utensils and tools used for cold process soap making should be dedicated solely to this purpose and not used for food preparation.
Steps: DIY Soap for Sensitive Skin with Oats and Honey
This soap is made using the cold process soap-making method. This traditional technique combines fats and oils with sodium hydroxide (lye), creating soap through a chemical reaction known as saponification.
Reminder: If your coconut oil and palm oil are solid due to cooler temperatures, melt them separately until they are liquid. They will cool down and be ready for use by the time you need them.
1- Ensure that you are applying the necessary safety precautions mentioned above before starting.
Prepare Sodium Hydroxide Solution
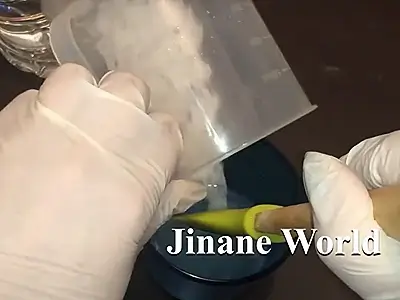
2- In a medium-sized beaker, place 37 grams (1.30 oz) of sodium hydroxide.
3- In a separate medium-sized beaker, pour 75 grams (2.65 oz) of distilled water.
4- Slowly empty the beaker containing the sodium hydroxide into the beaker containing the distilled water:
- Begin with a small amount and stir with a silicone spatula; continue this until all of the sodium hydroxide is added, ensuring that it has dissolved completely.
- It is important not to do this in the opposite way: pouring distilled water onto sodium hydroxide can be hazardous!
- Carry out this process slowly and keep the beaker at a safe distance from yourself.
5- Once the sodium hydroxide has fully dissolved, allow the solution to cool. Make sure the beaker is placed in a safe location, out of reach of children and pets.
Prepare The Oils
6- In a separate large beaker, pour 125 grams (4.40 oz) of olive oil.
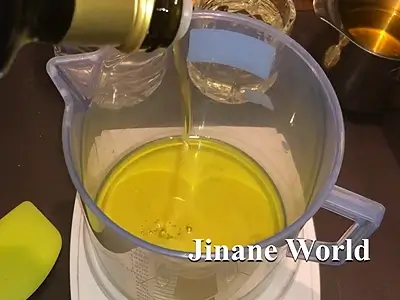
7- Add 62 grams (2.18 oz) of coconut oil.
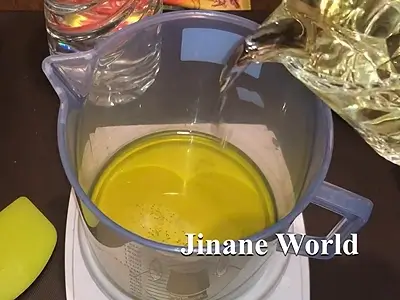
8- Add 62 grams (2.18 oz) of palm oil.
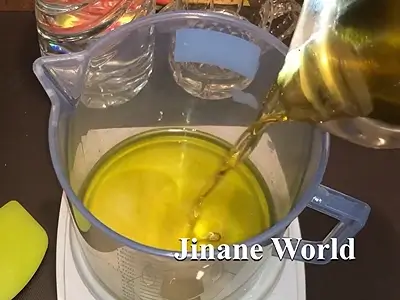
9- Stir the oils and put the beaker aside.
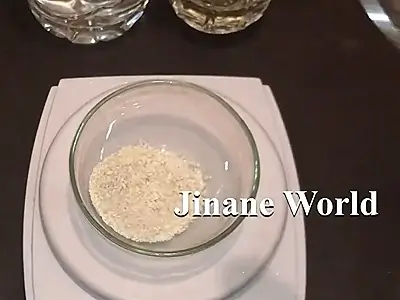
Prepare The Oat
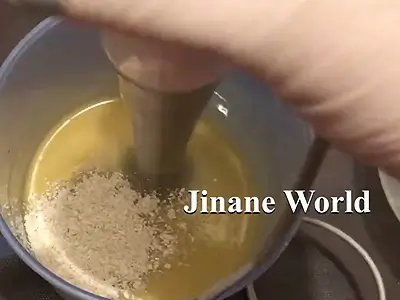
10- In a separate small bowl, place 5 grams (0.17 oz) of finely ground oat powder.
Making the Soap
The sodium hydroxide solution and the mixture of oils, both prepared earlier, must be at approximately room temperature before you proceed with mixing.
11- Pour the sodium hydroxide solution slowly into the mixture of oils while stirring with a silicone spatula. Do not pour the oils over the sodium hydroxide solution.
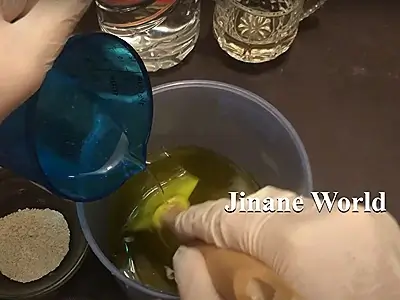
12- After pouring the sodium hydroxide solution into the oils, continue stirring for one minute. The mixture will start to thicken.
13- Using an electric hand mixer, whip the contents for 5-10 seconds, then stop the electric mixer and stir with the silicone spatula or with the mixer shaft itself for a few seconds.
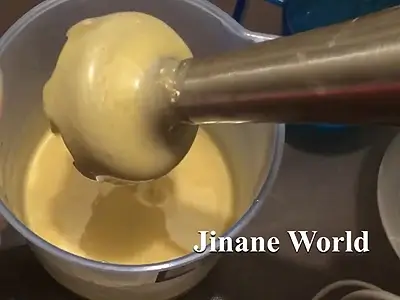
Continue alternating between the electric mixer and manual stirring, until you see the soap mixture thicken: a viscous, thick layer covers the lower part of the shaft of the electric mixer. When you achieve this thickening, this means that the saponification (the process of making the soap) is complete.
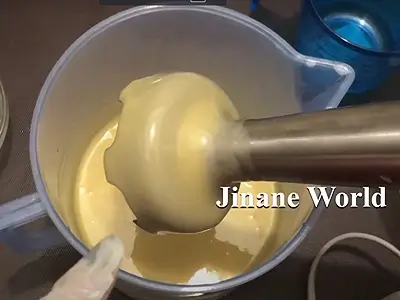
14- Add the oat powder that was measured earlier to the soap mixture.
15- Stir the contents manually with the silicone spatula or with the mixer shaft.
16- Add a half teaspoon of natural honey.
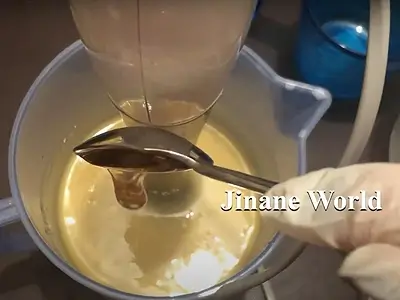
17- Stir the soap mixture thoroughly for 40 seconds using the silicone spatula or the mixer shaft.
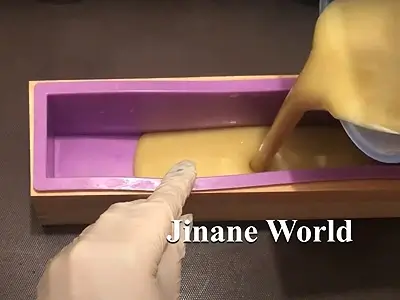
18- Pour the soap mixture into a rectangular silicone mold.
19- Optional: Sprinkle some oat flakes on the surface for decoration.
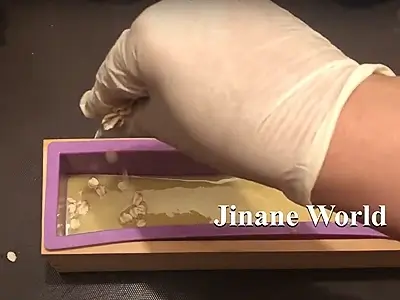
20- Cover the mold with a towel or another cloth to prevent soda ash from forming on the surface of the soap.
21- Allow the soap to solidify completely for approx. 24 hours.
22- After the soap has solidified, remove the bar gently from the mold.
23- Use a knife to cut the soap into appropriately sized pieces.
24- Important: The soap bars must cure for at least 6 weeks. This curing period allows the sodium hydroxide to fully dissipate. Only after this time can you use the soap or package it for gifting.
How to Use
Here’s how to use your DIY Oat and Honey Soap:
a- Wet Your Skin: Start by wetting your skin with warm water. This helps to open up your pores and prepares your skin for cleansing.
b- Lather the Soap: Rub the soap bar between your hands or directly onto your skin to create a rich, bubbly lather. If you prefer, you can use a washcloth or sponge to help generate more lather.
c- Cleanse: Gently massage the lather into your skin using circular motions. This helps to exfoliate and cleanse effectively.
d- Rinse Off: Rinse thoroughly with warm water, ensuring all soap residue is removed.
e- Pat Dry: Gently pat your skin dry with a clean towel. Avoid rubbing, as this can irritate sensitive skin.
f- Store Properly: To extend the life of your soap, keep it dry between uses by storing it on a soap dish that drains well.
Benefits
Here are the benefits of using DIY Soap for Sensitive Skin with Oats and Honey:
Gentle Exfoliation: Finely ground oat flakes provide mild exfoliation, helping to remove dead skin cells without causing irritation.
Soothing Relief: Honey is renowned for its calming effects on the skin. It helps to soothe irritation, reduce redness, and provide relief from minor skin discomfort. Its natural anti-inflammatory properties help maintain a balanced and comfortable skin environment.
Moisturizing: Both oats and honey are known for their moisturizing abilities, helping to keep the skin hydrated and soft.
Nourishing: Packed with essential vitamins and antioxidants, oats and honey work together to nourish the skin. Oats contain vitamins B and E, which support skin health, while honey provides antioxidants that protect the skin from environmental damage, promoting a healthy, radiant complexion.
Non-Irritating: Formulated with gentle, natural ingredients, this soap is ideal for those with sensitive skin, minimizing the risk of allergic reactions or dryness.
Here are more tutorials of interest:
- DIY Glycerine Soap with Mint Recipe: Refresh Your Skin with a Minty Delight!
- DIY Himalayan Bath Salts Recipe: Natural Healing Minerals for a Blissful Detox Soak
- DIY Glycerine Soap with Charcoal and Shea Butter: Creative Double Action Recipe
- DIY Bath Salts for Cleansing and Relaxation: Simple Recipe for Colorful Bath Salts
- DIY Orange Cold Process Soap: How to Make Natural, Skin-Brightening Soap at Home
Video How-To on My Channel | Jinane World
The steps to make the DIY Soap for Sensitive Skin with Oats and Honey are demonstrated in this video. If you wish to skip the introduction and precaution details, start at timestamp 11m40s.