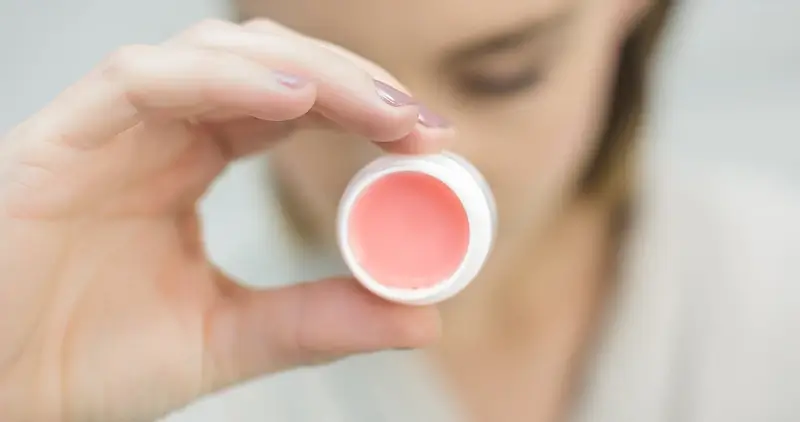
Discover a fresh twist on lip care with our DIY Natural Lip Balm with Strawberry Sparkle. This recipe features shea butter that enhances the texture and effectiveness of the balm, providing a new level of comfort and care for your lips.
Building on the success of our previous mango-infused lip balm, this strawberry variation introduces a touch of sparkle and a delightful flavor. With easy-to-follow instructions, you’ll create a moisturizing balm that enhances your lip care routine. Try this new, strawberry-inspired recipe and give your lips a vibrant boost!
Ingredients Needed
Choose high-quality ingredients to boost the effectiveness and safety of your DIY beauty products.
- Refined Shea Butter (odorless): Provides a rich, moisturizing base for the balm, ensuring smooth application without strong odors. Unlike natural or unrefined shea butter, refined shea butter undergoes a process to remove impurities and odors, resulting in a more neutral scent and a lighter texture. This makes it ideal for lip balms where a subtle, unobtrusive base is preferred.
- Sweet Almond Oil: Adds hydration and nourishment, helping to soften and condition the lips.
- Natural Beeswax: Acts as a thickening agent, giving the balm its structure and creating a protective barrier on the lips.
- Mica Color Powder (dark red color): Adds a subtle, natural tint to the balm, enhancing its visual appeal.
- Food Flavoring (strawberry flavor): Infuses the balm with a pleasant strawberry taste and scent.
Tools Needed
- Scale to weigh quantities
- Small stainless steel bowl
- Tablespoon
- Wooden popsicle stick
- Small silicone spatula
- Small suitable container(s) to store your DIY Natural Lip Balm with Strawberry Sparkle
Prior to use, ensure that both your utensils and containers are properly cleaned and disinfected. Wash them with warm soapy water, dry with a tissue, and then sanitize by spraying with 70% medical alcohol. Wipe them clean and let them air dry before use.
Steps: DIY Natural Lip Balm with Strawberry Sparkle
1- Begin by placing 10 grams (0.35 oz) of refined shea butter (odorless) in a small stainless steel bowl.
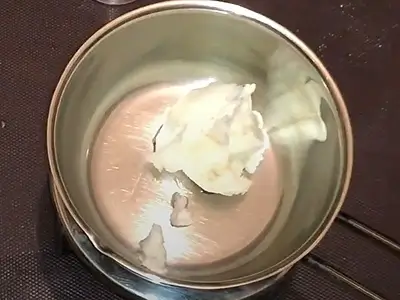
2- Add 5 grams (0.17 oz) of sweet almond oil.
3- Add 4 grams (0.14 oz) of natural beeswax.
4- Using the end of a wooden popsicle stick, pick up a small amount of dark red mica powder and add it to the bowl.
5- Gently heat and melt the ingredients in a bain-marie (hot water bath). A bain-marie is made by placing the bowl in a larger pot of hot, steaming water. This will gradually heat and melt the contents. Make sure to stir while the mixture is melting. Avoid boiling.
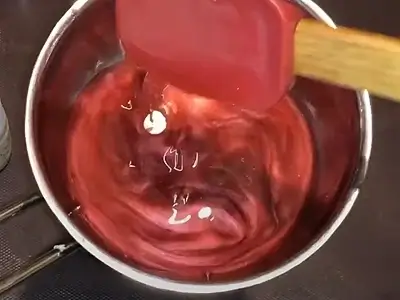
6- Add 6-7 drops of strawberry food flavoring to the mixture.
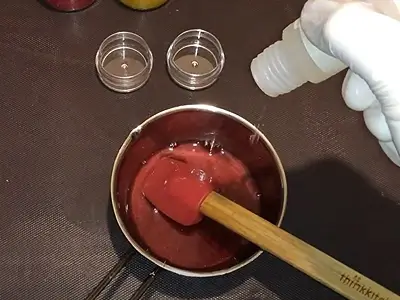
7- Stir the ingredients thoroughly with a small silicone spatula.
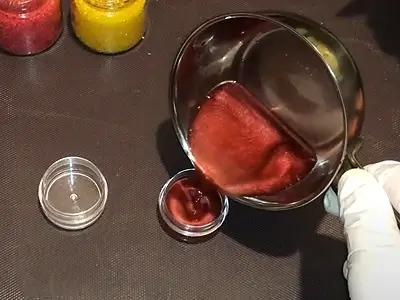
8- Pour the lip balm into one or more small, suitable containers.
9- Allow the lip balm to cool and solidify. In warm temperatures, you can place the lip balm in the refrigerator to speed up the cooling process.
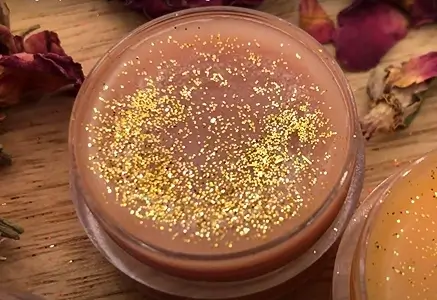
10- Once the lip balm has cooled and hardened, it is ready for use! In the image below, I added some glitter for a decorative touch.
How to Use: DIY Natural Lip Balm
After using our DIY Lip Scrub for Soft Lips, complete your lip care routine with this DIY Natural Lip Balm:
a. Ensure your lips are clean and free from any scrub residue.
b. Take a small amount of the DIY Lip Balm on your fingertip or a clean lip brush.
c. Gently apply the balm to your lips, starting from the center and spreading outward.
d. Use your fingertips to massage the balm in light, circular motions for even coverage and absorption.
e. Reapply as needed throughout the day to keep your lips moisturized and refreshed.
f. Enjoy the sweet strawberry flavor and revel in your soft, hydrated lips!
Benefits
Here are the benefits of the DIY Natural Lip Balm with Strawberry Sparkle:
Moisturizing Hydration: Delivers deep, lasting moisture to keep your lips soft and smooth.
Nourishment: Enriched with natural ingredients to soothe and condition your lips, promoting overall lip health.
Protective Barrier: Creates a shield against dryness, chapping, and environmental elements, keeping your lips protected.
Non-Greasy Formula: Offers hydration without a heavy or greasy feel, ensuring comfortable wear throughout the day.
Natural Glow: Adds a subtle, beautiful tint with a touch of shimmer, enhancing your natural lip color.
Sweet Sensation: Infused with a delightful strawberry flavor, making your lip care routine enjoyable and refreshing.
Here are more articles of interest:
- DIY Cleanser and Makeup Remover Balm: Purify Your Skin from Impurities and Makeup
- DIY Lip Balm Recipe with Mango Bliss: Embrace Soft and Juicy Lips
- DIY Oil to Milk Cleanser and Makeup Remover: Refresh Your Visage
- DIY Natural Eyeliner Recipe: Beeswax Beauty for Your Eyes
- Affordable DIY Shimmery Loose Powder: Shine Like a Star
Video How-To on My Channel | Jinane World
The steps to make this DIY Natural Lip Balm with Strawberry Sparkle are demonstrated at the timestamp 10m21s of this video. The only difference between this article and the video is that in the article I use refined shea butter instead of cocoa butter.