
Welcome to our guide on creating your own DIY Vitamin C Serum! If you’re looking to boost your glow and achieve radiant, youthful skin, this article is for you.
In this step-by-step tutorial, we’ll show you how to harness the power of fresh orange peel and create a magical concoction that will transform your skincare routine. With our homemade recipe, you can enjoy the benefits of a vitamin C serum without the hefty price tag. So let’s dive in and learn how to make your very own DIY Vitamin C Serum, packed with all the goodness your skin craves!
Ingredients Needed
- Fresh orange peel, cut up in pieces. Ensure that the orange is properly washed and clean.
- Vegetable glycerine
Tools Needed
- Cup for measurement
- Tablespoon
- Wooden popsicle
- Glass container to prepare the DIY Vitamin C Serum
- Glass dropper bottle to store the serum
Prior to use, ensure that both your utensils and containers are properly cleaned and disinfected. Wash them with warm soapy water, dry with a tissue, and then sanitize by spraying with 70% medical alcohol. Wipe them clean and let them air dry before use.
Steps: DIY Vitamin C Serum
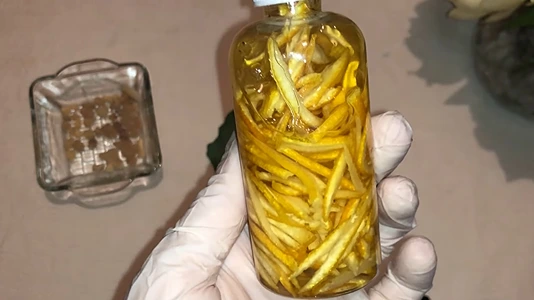
1- Start by adding 4 full tablespoons of fresh orange peel pieces into the container.
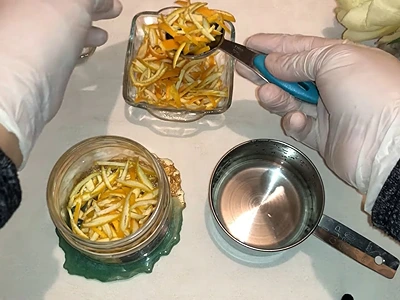
2- Add 1/2 cup (120 milliliters or 4 US fluid ounces) of vegetable glycerine.
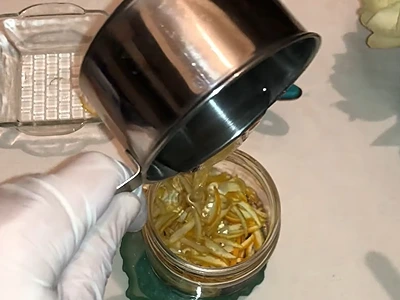
3- Mix the contents to ensure the orange peel pieces are all covered with the glycerine.
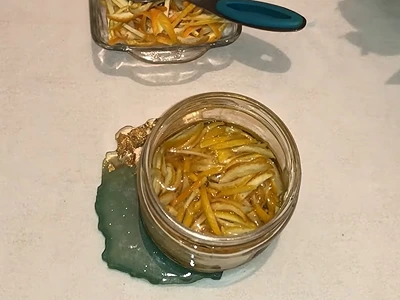
4- Seal the glass container and store it for 7 days in a closet away from any light.
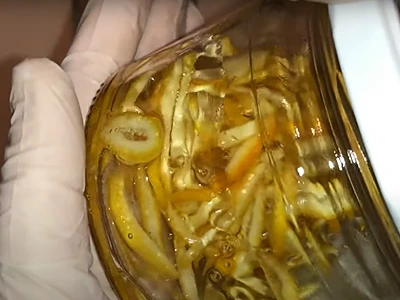
5- After 7 days, filter out all the orange peel pieces and pour the serum into a glass dropper bottle.
6- The serum is valid for 3 months.
How To Use: DIY Vitamin C Serum
Now that you’ve created your very own DIY Vitamin C Serum with fresh orange peel magic, it’s time to incorporate it into your skincare routine. Follow these simple steps to make the most out of your homemade creation:
1- Cleanse your face: Start by washing your face with a gentle cleanser to remove any dirt, oil, or impurities. Pat dry with a clean towel.
2- Prep your skin: Gently exfoliate your skin using a mild scrub or toner to ensure a clean and smooth surface for the serum to penetrate effectively.
3- Apply the serum: Take a few drops of your DIY Vitamin C Serum onto your fingertips. Gently massage the serum onto your face and neck using upward motions. Avoid the delicate area around your eyes.
4- Let it absorb: Allow the serum to fully absorb into your skin for a few minutes. This will give the potent ingredients a chance to work their magic and provide nourishment to your skin.
5- Moisturize: Follow up with your favorite moisturizer to lock in the benefits of the serum and keep your skin hydrated throughout the day or night.
6- Sun protection: Since vitamin C can make your skin more sensitive to sunlight, it’s crucial to apply a broad-spectrum sunscreen with an SPF of 30 or higher before heading out during the day. This step will help protect your skin from harmful UV rays.
7- Repeat daily: For optimal results, incorporate your DIY Vitamin C Serum into your skincare routine on a daily basis. Consistency is key when it comes to reaping the benefits of this natural skincare gem.
Remember, everyone’s skin is unique, so it’s essential to monitor how your skin reacts to the serum. If any irritation occurs, discontinue use and consult a dermatologist. With regular use and proper care, your DIY Vitamin C Serum can enhance your skin’s natural radiance and leave you with a healthy, glowing complexion.
Benefits: DIY Vitamin C Serum
DIY Vitamin C Serum offers a wide range of benefits for your skin. By incorporating this homemade serum into your skincare routine, you can enjoy the following advantages:
Brightens and evens out skin tone: Vitamin C is a potent antioxidant that helps reduce the appearance of dark spots, hyperpigmentation, and discoloration, resulting in a more even and radiant complexion.
Boosts collagen production: Vitamin C plays a crucial role in collagen synthesis, a protein that gives your skin structure and elasticity. By stimulating collagen production, the serum helps improve skin firmness and reduce the signs of aging, such as fine lines and wrinkles.
Fades signs of sun damage: With its antioxidant properties, DIY Vitamin C Serum can help repair sun-damaged skin. It aids in reducing the effects of harmful UV rays, such as sunspots and sunburn, while protecting against further damage.
Hydrates and moisturizes: The vegetable glycerin in the serum acts as a humectant, drawing moisture to the skin and helping to lock it in. This hydration boost leaves your skin plump, supple, and moisturized.
Improves overall skin texture: Regular use of DIY Vitamin C Serum can enhance the overall texture of your skin. It helps to smoothen rough patches, refine pores, and promote a smoother, more even skin surface.
Provides antioxidant protection: Vitamin C is a powerful antioxidant that helps neutralize free radicals, which can cause damage to the skin cells. By protecting your skin from oxidative stress, the serum supports a healthier and more youthful-looking complexion.
Enhances skin’s natural defense: DIY Vitamin C Serum helps strengthen the skin’s natural barrier, providing an added layer of protection against environmental aggressors, pollution, and other external factors that can harm the skin.
Gives a youthful glow: By promoting healthier skin and addressing various concerns, DIY Vitamin C Serum helps impart a radiant and youthful glow, leaving your skin looking refreshed, revitalized, and rejuvenated.
Remember to store your DIY Vitamin C Serum in a cool, dark place to maintain its potency and freshness. With consistent use and proper application, you can enjoy the multitude of benefits that this homemade serum offers, revealing a healthier and more vibrant complexion.
More articles on DIY natural and handmade body oils and serums:
- DIY Lavender Essential Oil: Ignite Your Skincare Routine with the Power of Nature
- DIY Face Serum: A Natural, Radiant Boost for Your Skin
- DIY Hyaluronic Acid Serum: How to Make Your Own for Glowing Skin
- How to Make Body Bronzer The Easy Way
- Make Your Own Lip Oil For Sexy Lips
Video How-To on My Channel | Jinane World
The steps to make the DIY Vitamin C Serum are demonstrated in the first 5m 20s of this video